Showing posts with label abstract. Show all posts

Tuesday, July 22, 2014

"Partial Clearing" Mixed Media Collage

Partial Clearing
Mixed Media Collage on Canvas
8" x 8"

I've been busy listing this piece along with some of my other recent work in my Etsy Shop today. This is an original mixed media collage that I originally blogged about here. It is a very textural piece, due to the papers and modeling paste used to create texture under the painting. Thank you for your interest in my art! I'm happy to answer any questions. 

Friday, October 25, 2013

Cityscape, Wabi-Sabi Style

Partial Clearing
mixed media on 8" x 8" canvas

In the wabi-sabi style, textures are rough, colors are subdued and mystery is admired. That's what I had in mind while working on this painting. For texture, I pressed wire mesh into modeling paste. I hadn't used modeling paste previously and was surprised at how long it takes to dry! But the texture is great. I also have some wonderful, gauzy paper that looks so beautiful in collage. I'm not sure if I'm finished yet with this one or not -- I'd like to build up the layers of paint toward the top, but I don't want to over do it, or ruin what I already am liking about this piece.  

Thanks so much for stopping by -- I always appreciate your comments!

Thursday, September 26, 2013

Face #18: Doe-eyed Abstract


Another attempt at an abstract face -- this one is a mixed media sketch in my sketchbook, beginning with ball point pen, then adding a bit of pencil, charcoal, and colored pencil. I kinda like her!

Wednesday, September 25, 2013

Face #14: Abstract Portrait


 Realistic faces are not easy to do well, nor are abstract faces for that matter! I really want to be able to do abstract faces. I'm not sure why. It's just what I want to do. So here is an attempt at an abstract face. I used a thick sharpie to outline shapes and then began painting, first with watercolor, then before I knew it, the acrylics were out again. I was keeping in mind the concept of suggesting dialog by having two figures in the painting as I learned in Diane Culhane's excellent between speech and silence class, hence the bird. I added a bit of collage again at the end, because I love collage, especially bits of text like this. I love languages, reading, poetry, and words, so I enjoy having bits of text in my pieces that give some interesting visual texture and hopefully create a bit of mystery as well.

Thursday, September 12, 2013

Identity Crisis

We all know adults who who still don't know who they want to be when they grow up. In fact, I find myself in that category from time to time.  When it comes to my art, I seem to be the artist who doesn't know what she wants to do, or conversely, I'm an artist who wants to do it all! At some point, though, it's time to focus more, to settle down and choose my own style. Or is it? I've been painting a lot lately, which is great. But a quick look at what I've worked on over this past week shows that I am clearly all over the place with my art!!

This is a page from an altered board book I started last spring while taking Carla Sonheim's "Flower Crazy Class." The technique involves using collage, gesso, watercolor and pencil. I love doing flowers, watercolor, drawing and feel like I could just keep doing these crazy flowers for the rest of my life and never get bored! 


Then I decided to try out the same technique, but with a different subject, resulting in this whimsical piece.


I really love integrating collage with my drawing and painting skills, but I also still love doing 'pure' collage. Before I knew, it, I'd done this little collage.


And then, to further complicate things, I've been working on this abstract acrylic painting! 


So, as you can see, I really am not very focused in what I'm doing. Following my whims is certainly fun, but is it wise? Is it important to settle on one style?

Thanks so much for stopping by! Your comments are always appreciated.
Wednesday, July 18, 2012

Going in Circles: Exploring a Theme

This month I've been having a lot of fun exploring the theme of circles with the Sketchbook Challenge group. I've been doodling and using circles to create abstract compositions. In some, I've incorporated collage elements.
You can see more of my circle explorations here
"Take time to just sit within the circles of time, space and matter. I'm willing to bet you will be met with some expansive understanding in the process."
From Circle Symbol Meaning www.whats-your-sign.com/circle-symbol-meaning.html

Thursday, April 19, 2012

A Difficult Subject and a Happy Ending

These past few weeks I've been busy doing a lot of small collages, using bits of painted papers (read more about this process here) and other elements. Here is one I'm calling "A Difficult Subject."


I used some charcoal in the background, then used clear gesso, followed by the collage elements, and finally, some watercolor. (really not so difficult, and definitely a whole lot of fun)


While we're on the subject of fun, this past year has been one of creative frenzy for me as I've rediscovered my love of creating and making art. One thing I've become very good at is starting a lot of paintings. Sometimes my work just flows and comes together easily into a finished piece, and others, well...let's just say I've got quite a few of those! I can't make myself throw them out, though. I put them away for awhile, hoping that I'll figure out how to finish them someday. Here is one of those paintings. I can't even remember how I started this one. I think I was probably using up paint that I'd put out and didn't want to waste. I know I worked on it at several different times. The other day, I took it out again and decided I kind of like it, just as it is. So, here is my newly finished painting of the week, "Sunscape". 


Which leads me to a question. How should I frame small pieces such as these? Some are standard size, and others are not. The small collage is actually on mat board. How do you all do it? Do you know of sources for economical (but nice) frames? Do you make your own? Thanks in advance for your advice! 

Thursday, March 29, 2012

Rhapsody in Blue: Experimenting with Acrylics

Over the years, I've had a love/hate relationship with acrylics. Well, to be honest, probably more hate than love. I first experimented with them long before I ever tried oils and really wanted to love the medium. The easy cleanup was a huge bonus for me. But the paint always dried so fast and my end result never seemed to look the way I wanted it to. Along the way, I did try oils, and then watercolor, which stole my heart. There is just something about the way the water flows on paper that keeps me coming back for more. But about a year ago, as I began experimenting with mixed media techniques, I kept hearing about the new fluid acrylics, so I finally decided I should give them a try. So here I am, once again experimenting with acrylic painting.


When I started out with these two paintings, I wasn't sure if I would use the painting as background for collage or just paint. I ended up liking the colors and shapes enough that I decided to just paint and see what happened. This is also part of my ongoing challenge to learn how to do abstract compositions.

I doubt that acrylics will ever become my primary medium, but they have some useful qualities for mixed media art. Their colors are more intense than watercolor, and the fact that they dry fast and are permanent is very nice for working with layers. The fluid acrylics also lend themselves to some interesting paint effects that I love in watercolor. So, I'm sure I will continue to experiment with them and use them to a certain extent in my artwork.

I recently discovered the Creative Color Challenge  on Flickr and posted my paintings there for the March color theme of tranquil blues.

Thanks so much for visiting! I really appreciate your comments.

Thursday, March 15, 2012

Ink Blot Painting

Today's paintings began with inkblots and swirls on prepared panels. I did some quick doodling with the ink, and then blew the ink around with a straw to help it flow around and make interesting lines.
I then added layers of wax and color, and some image transfer of text and numbers to add more texture and balance out the black from the ink.
This was really fun. I'm happy with my colors here, and I love the way the ink shows through the layers of wax. I'm pretty sure I'll do some more like this, but I'll look for some interesting poetry or words that can actually be read to add some more dimension and meaning, perhaps some haiku to go with the Asian vibe I'm getting with this color scheme and medium. Thanks so much for stopping by! Feel free to tell me what you see in those inkblots and I'll get back to you with an analysis if you'd like!

Monday, March 12, 2012

When is a Painting Finished?


How do you tell when a painting is finished? Sometimes it's easy to tell, and well, other times, not so much. This is an encaustic painting I've been working in a class I'm taking. I did most of it very quickly, without thinking much about what the final result would be. During the next class, I was working on it again, adding little bits here and there. Suddenly I heard my instructor's voice behind me saying, "You're done with that piece!" So am I? I'm not completely sure. It's not one of my favorites, but then again there are some things I like about it. Would adding more or fussing more with it improve it, or only mess it up? So here it is, for now, at least, a finished piece.

Thursday, March 8, 2012

Encuastic Image Transfer Fun


I am sure loving my encaustic class. This week we learned how to do image transfers into the wax. It's quite easy and I love the effect! First you place a photocopied image into warm(not molten)wax. Then you dampen the paper to gently rub away the paper and the ink magically stays behind in the wax. Of the image transfer techniques I've tried, this definitely ranks up there in ease and speed. Of course by now there is a very good chance you're scratching your head and thinking image transfer? What image? Well, in this case, I transferred some text for some visual texture. I'm secretly amused that it comes from a handout that I used in my day job as a teacher. Perhaps on some level this bridges the gap between the competing interests in my life. I also used stencils for the leaf design and for the circle (my first, and possibly my last, homemade stencil).

Thanks for visiting! Happy Paint Party Friday!!

Sunday, December 11, 2011

Encaustic Painting

"Couldn't you just use the same griddle we use for food?" asked my practical minded husband as I was unpacking my newly purchased griddle to use for encaustic painting. My encaustic starter kit had arrived a few days earlier and now with griddle and heat gun in hand, I was ready to try encaustic painting at home. Last October I'd had the privilege of taking an encaustic workshop with Serena Barton in Portland and immediately fell in love with this medium. Even though I was somewhat hesitant to try it out at home, in the back of my mind, I knew resistance was futile.

So here is my first home effort.


Before the first layer of wax, I painted a watercolor background, and stamped with hand carved stamps. The butterfly actually began as a stamped image which I then layered over with paint, followed by some incising marks and rubbed oil paint. I also used some oil paint stick and pastel. Though you aren't able to see it, there is also a layer of collaged tissue paper from an old dress pattern with some pastel drawing in the bottom part. I love the effect of wax over watercolor! It creates a beautiful depth and luminosity to the painting.

And here is another one I did the next day.


This one includes some collage elements and image transfer. The haiku (that might not be a real haiku) collaged into the painting reads:

No one travels
Along this road but I
This autumn evening

Hence the subdued tone of the work.

So now I know I can do encaustic at home with very little mess or trouble. I don't have a studio (yet) so I bought a big plastic tub that the griddle with paint tins fits into, along with the heat gun and other supplies. When not in use, it's easily stored away on a shelf in the garage. In February, I'll be taking a class in encaustic locally to learn more about this exciting medium. I can't wait!!

Friday, November 4, 2011

Works in Progress

Life is busy these days now that I'm back at my day job. It's harder to find time to for art, but I"m determined to keep at it, even if it's at a slower pace. I did manage to start these two pieces this week. I love playing around with paint and had a lot of fun collaging and layering textured washes here:


At this point, I'm thinking of this as the background, but I need to decide what else to do to finish the painting.

This one is also a mixed media painting with collage elements that I've been working on. Again, I used a lot of textured washes and papers in the background. Then, I added the collaged leaf and did some more painting. It's not finished, though I'm not completely sure where I'll head with it, either by adding more collage elements, painting, or both.


Thanks for looking! I welcome and greatly appreciate your comments!

Wednesday, August 31, 2011

Abstract Self Portrait: The Eyes Have It


I recently joined the loving mixed media website which can be found here: http://lovingmixedmedia.com/main Today I tried the Abstract Painting challenge there, to basically take a photograph, cut it apart, rearrange into an interesting composition, and paint it. This is what I ended up with. It was a lot of fun to do! Although I love abstract composition, I'm somewhat intimidated by it and not sure how to create a successful composition. This was a fun exercise and gave me a new way to begin an abstract work. I had already prepared my panel with venetian plaster. I love the interesting textures it created!

Friday, September 10, 2010

Tissue Paper Collage with Flowers

In this tissue paper collage, I used tissue paper and some patterned wrapping paper. I used paper more sparingly than in my first attempts and played around a bit more with texture and transparency.

Collage First Attempt

Last spring, I had the opportunity to teach a lesson on making collages in my son's 4th grade class. I was so inspired during the lesson, watching the children's enthusiasm as they made their collages, that I came home and immediately made some collages. Here are two of my first collages.


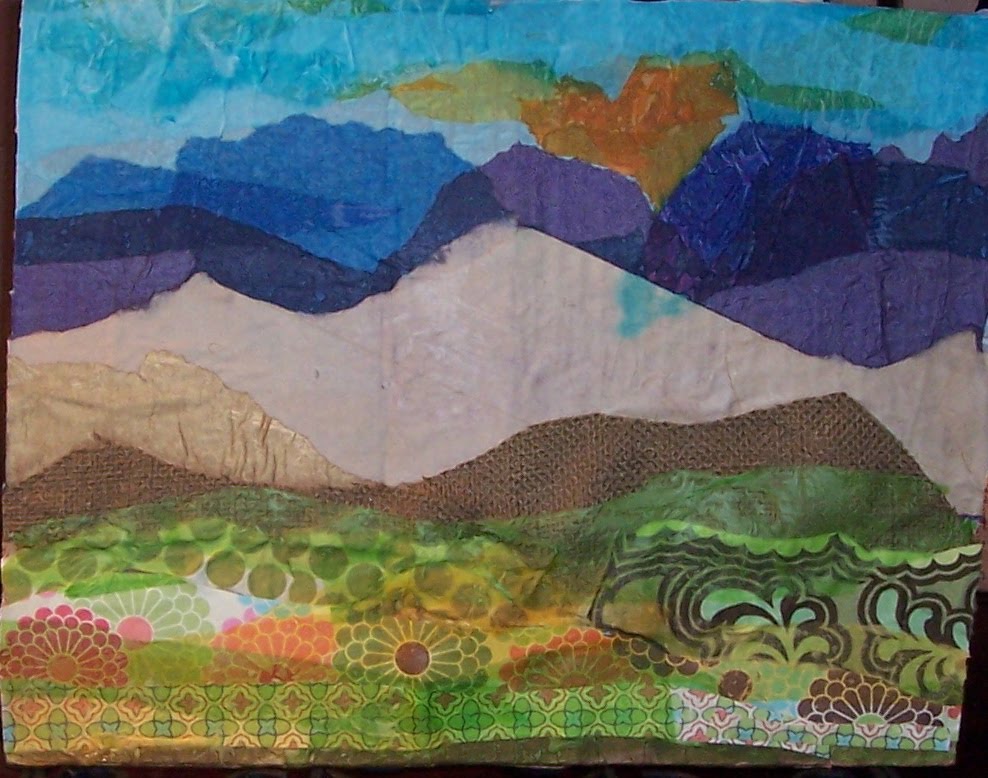
In this abstract collage, I used a combination of paper and fabric, combining images and text with visual and tactile texture. To emphasize linear elements in the composition, I added some black yarn. My second attempt below is a more recognizable abstract landscape composition. I layered tissue paper along with a combination of fabric and plain paper.